Rabu, 27 November 2013

Woman cannot live by cookies alone.

Happy Thanksgiving Eve!!!  

I hope you guys have just the loveliest Thanksgiving with family and friends.  And pie.  Lots of pie.
the vintage pearl golden eternity heart necklace, plus giveaway!
Here's a little treat for you. {Psst...it's JEWELRY!
It's a little treat to hold you over until the shopping starts on FRIDAY.  Do you hear me Macy's?  Target?  FRIDAY.

the vintage pearl gold jewelry
Anyhoo...I just love stamped and personalized jewelry.  I was so so thrilled to find that The Vintage Pearl offers beautiful hand-stamped jewelry in gold tone!!!  YAY!!!  I think gold looks better on my skin, so I was ecstatic to see their pieces.

This is my new favorite piece:  it's the Golden Eternity Heart necklace.
vintage pearl instagram photo vintagepearlinstagram.jpg
You can have it stamped with names, or a favorite quote.  I chose this quote from George Bernard Shaw,

"A happy family is but an earlier heaven."  


I love it.  It's perfect...just big enough, but still delicate

  the vintage pearl golden eternity heart necklace, plus giveaway!

We're having a Vintage Pearl giveaway! 

The Vintage Pearl is offering TWO $50 gift certificates to you guys!  Yay!

To enter, go visit The Vintage Pearl, come back and leave a comment here telling me one of the items you love.

For an extra entry, leave a separate comment stating whether you're a silver or gold person (or both)!

*If you are reading this post in an email, click the post title to open it in your web browser.  Then, leave a comment.*

Entries accepted through 11:59pm CST, December 2nd.
(I cannot believe that I just typed "December.")

Happy, happy Thanksgiving!  
I YAM so thankful for you all.
(See what I did there?) ;) 

And, Houston area folks...they now have a shop in Sugarland!!! 


Minggu, 24 November 2013

Thankful (cookie) Hearts

These two-sided cookie hearts double as place cards AND dessert. 

They're also a delicious way to get everyone talking about what they're thankful for this year.
thankful (cookie) hearts ::: interactive cookies for thanksgiving dessert, easy and quick to make! from @bakeat350
On one side, you write each guest's name.  Then, give them a food coloring pen and let them write what they're thankful for on the other side.

thankful (cookie) hearts ::: interactive cookies for thanksgiving dessert, easy and quick to make! from @bakeat350

Their answers just may surprise you.

I'm blogging about how to make them over on Parade.com.

thankful (cookie) hearts ::: interactive cookies for thanksgiving dessert, easy and quick to make! from @bakeat350
{Here you can see what kiddo and I wrote on our thankful cookies.}


thankful (cookie) hearts ::: interactive cookies for thanksgiving dessert, easy and quick to make! from @bakeat350

Come see what Mr. E is thankful for this year. ;)


***
PS...I am not the first person to make interactive "thankful" cookies.  Check out these beauties from Amanda of i am baker.  I am thankful for her inspiration!*** 

I Only Have Pies for You.

Here we are.  The beginning of Thanksgiving week...or pie week, as I like to think of it.  

Today, I bring you some of my favorite fall pies, perfect for your Thanksgiving feast.  

Just click the links for the full recipes.

sweet potato pie plus links to several pies perfect for Thanksgiving!
1. Sweet Potato Pie.  It was years before I ever tried making sweet potato pie.  I would pass over pumpkin for sweet potato EVERY time now.  If you don't love pumpkin pie, try sweet potato!

cranberry apple pie plus links to several pies perfect for Thanksgiving!
2. Cranberry Apple Pie.  This has been my go-to pie recipe for years now.  It's beautiful and delicious without fail.  A family favorite.

pecan chewies plus links to several pies perfect for Thanksgiving!
3. Pecan Chewies. Mini pecan pies...without all of the pecan pie goo.  You know what I mean?  These are irresistible.

pie crust primer plus links to several pies perfect for Thanksgiving!
4. Pie Crust Primer.  Nervous about making a pie crust?  Don't be.  It's easy as....pie.

perfect graham cracker crust plus links to several pies perfect for Thanksgiving!
5. Perfecto Graham Cracker Crust. Probably the easiest crust you'll ever make.


The following recipes I have not made myself, but I trust these bakers...and these pies look fantastic!

If you're looking to make something other than pie, check out this round-up of clever alternatives to pies for Thanksgiving!

Happy Pie Week!
What's your favorite Thanksgiving pie?  Tell me (or leave a link to the recipe) in the comments!

Kamis, 21 November 2013

Hey there, neighbors! (Houston book signing)

I shared this on Facebook and Twitter, but it occurred to me that I haven't mentioned it on the blog.  

Decorating Cookies by Bridget Edwards @bakeat350

I'll be signing copies of Decorating Cookies tomorrow (or tonight, depending on when you see this), November 22nd at Barnes & Noble in The Woodlands from 5-6pm.  Just in time for the holidays!

Barnes & Noble has a fun day planned with lots of incredible discounts, including the new Nook GlowLight, and prizes!  Prizes, people!!!  (I love prizes.)

I'll be signing books...and probably sampling the pastries and cappuccinos at the in-store Starbucks.  Come say hey! :)

{If you can't make it, I'll be leaving some signed copies at the store.  Give them a call or stop by.}
Hope to see you there!


Selasa, 19 November 2013

Peanut Butter Cup Turkey Cookies

These are not your average, everyday turkey cookies. 
{Wait...are there everyday turkey cookies?  Let's think about this.}
 peanut butter cup turkey cookies...triple-shot of peanut butter: cookie, cup & frosting! from @bakeat350
So, what makes them special?

peanut butter cup turkey cookies...triple-shot of peanut butter: cookie, cup & frosting! from @bakeat350
First...there's a big ol' peanut butter cookie as the base.  Then, the peanut butter cup "body" (secured with some melted chocolate).  Oh!  And the feathers?  That's peanut butter buttercream, my friends.

Peanut Butter Cup Turkey Cookies...

You'll scoop the cookies out and flatten them with the bottom of a glass.
 photo PBturkeycookies10of8.jpg

When they bake, they get a little poufy, then flatten out as they cool.
big, beautiful, peanut butter cookies from @bakeat350

Now, things are getting interesting....
pb turkey cookies start photo PBturkeycookies12of8.jpg

I just couldn't resist adding the little mouths on their faces.  Smirk, full smile, heart lips?  I couldn't decide.  All of the above!!!
peanut butter cup turkey cookies...triple-shot of peanut butter: cookie, cup & frosting! from @bakeat350

I'm sharing the recipe and assembly instructions over at Imperial Sugar.

{Gobble, gobble!}
pb turkey cookies side photo PBturkeycookies14of8.jpg

Minggu, 17 November 2013

Patron Saints of Animals and Music...

{This is the final installment of the All Saints' Day cookie tutorials.}
st francis of assisi cookie decorating tutorial, patron saint of animals
Let me introduce you to St. Francis of Assisi, the patron saint of animals, and St. Cecilia, the patron saint of music. I've always loved both of these saints.  Since my sister was a singer all through school, and a music major in college, my mom talked a lot about St. Cecilia.  I *always* think of my sister when I think of St. Cecilia.
st cecilia cookie decorating tutorial, patron saint of music

These cookies started just like the others, with inspiration from the shop Saintly Silver

st therese and brigid cutters photo sttheresaandbrigidcutters.jpg
The cookies start by baking two shapes together to form one.  For both of these, I used candy corn and circle cookie cutters.  Place the cut-out shapes next to each other on the cookie sheet before baking and they will bake together to form one cookie. (I like to freeze the shapes for 5-10 minutes before baking to prevent spreading.)

To make them, you'll need:

 photo sttheresaandbrigid1of9.jpg
Use a #2 tip to outline a circle for the face in copper icing.  (You can see the start of St. Michael here, also.)  Reserve some of this piping consistency icing for later.


Thin the copper icing with water, a bit at a time, stirring with a silicone spatula, until it is the consistency of a thick syrup.  You'll want to drop a "ribbon" of icing back into the bowl and have it disappear in a count of "one thousand one, one thousand two." Four is too thick, one is too thin.  Count of 2-3 is good.  Cover with a damp dishcloth and let sit for several minutes.

Stir gently with a silicone spatula to pop and large air bubbles that have formed.  Pour into a squeeze bottles.

Flood the face portion of the cookies with the thinned icing, using a toothpick to guide to the edges and to pop large air bubbles.

Let the icing dry at least one hour.

st francis outline beard filled photo stfrancisandcecilia1of9.jpg
On St. Francis, use a #2 tip to outline hair and a beard on the face.  Fill in the outline with the same piping consistency icing.

st francis beard toothpick photo stfrancisandcecilia2of9.jpg
Use a toothpick to swirl the icing, pulling the toothpick up to create texture.

Outline the remainder of the cookie with a #2 tips, including the halo.

st cecilia outline photo stfrancisandcecilia10of1.jpg
On St. Cecilia, use #2 tips to outline all of the parts of the cookie, including piping an outline for hair on top of the copper icing.

st cecilia flood photo stfrancisandcecilia5of9.jpg
Reserve some of the piping consistency icing for later.  Thin the brown, white, yellow, and blue icings for flooding as directed above.  Fill in the outlines.
st francis flood photo stfrancisandcecilia6of9.jpg
Let the cookies dry at least one hour.

st francis hands photo stfrancisandcecilia7of9.jpg
Use a #2 tip to pipe an outline for folded hands on St. Francis in copper icing.  Use a #2 tip to add lines for arms in brown icing.  Thin the copper icing and fill in the hands outline.  Let the icing dry for at least 30 minutes, then add the line on the hands.

st cecilia harp photo stfrancisandcecilia8of9.jpg
For St. Cecilia, use a #2 and #1 tips to pipe a harp in yellow icing.  Use a #2 tip to pipe detail on the blue robe.  Use a #2 or 1 tip to pipe a white headband.

st francis bird photo stfrancisandcecilia9of9.jpg
For St. Francis, use a #1 tip to add a bird on his shoulder in white icing.

Use a #1 tip to pipe eyes and a mouth on each.

Let the cookies dry uncovered 6-8 hours, or overnight.

The next day, use a pink food coloring pen to add rosy cheeks. (Warning: do not try this until the icing is COMPLETELY dry.)

st francis of assisi and st cecilia cookie decorating tutorials...part of an all saints' day set from @bakeat350
Do you know that there are patron saints for almost everything?!?

Rabu, 13 November 2013

The Pioneer Woman Cooks: A Year of Holidays PLUS a Boozy Pudding Cake!

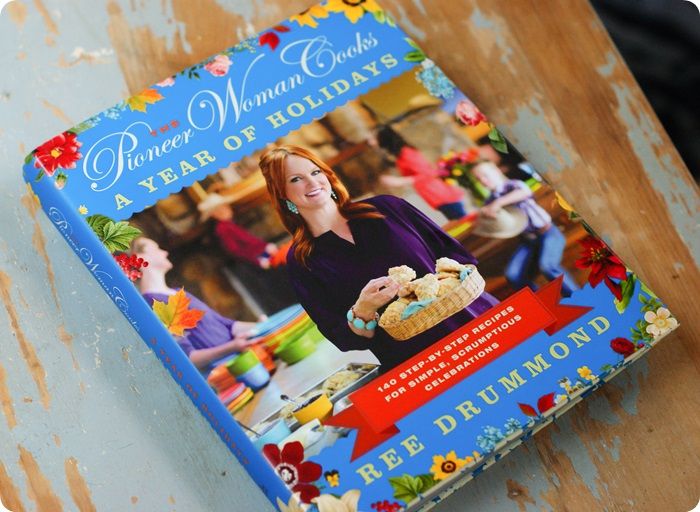
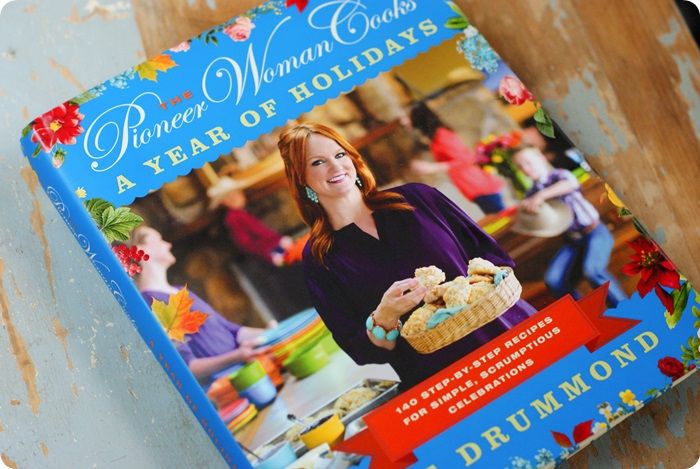
I can't wait to share this book with you today.  It's Ree's latest:
The Pioneer Woman Cooks: A Year of Holidays
The book is so beautiful that it's not with my cookbooks...it's on my coffee table. 

I think this holiday book may be my favorite.  Of course, I said that about Ree's last one and the one before that, but I really, really love this book.

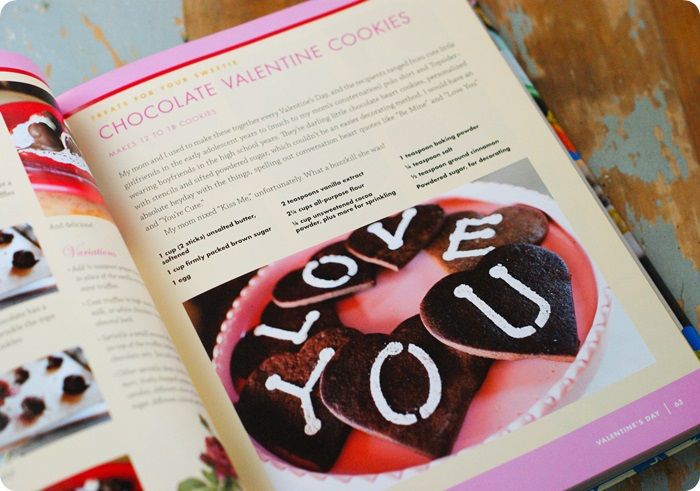
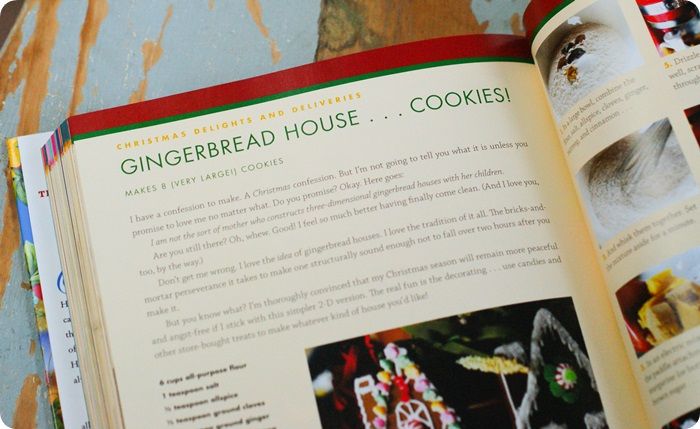
The Pioneer Woman Cooks: A Year of Holidays is divided up by, you guessed it, holidays.  You'll find recipes for Valentine's Day, Cinco de Mayo, Thanksgiving, Christmas, New Year's Eve...and everything in between.  All total: 140 recipes, all presented in Ree's signature step-by-step style.

pioneer woman holidays cookies photo pioneerwomanholidaysbook3of8.jpg
You know I went right for the dessert pages, right?

pioneer woman holidays cheese ball photo pioneerwomanholidaysbook5of8.jpg
I don't know what this says about me, but this Halloween "Cheese Ball of Death" really speaks to me.  Any recipe that calls for a gummy tarantula has to be a winner.

pioneer woman holidays horsies photo pioneerwomanholidaysbook6of8.jpg
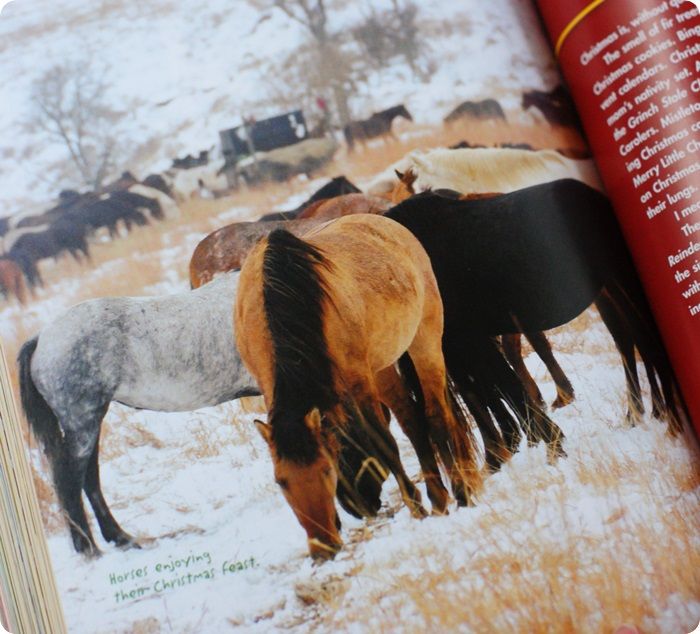
Of course, you'll find lots of pictures of the ranch and cowboys.

pioneer woman holidays gingerbread photo pioneerwomanholidaysbook7of8.jpg
Do you read cookbooks like novels?  Me, too.  I love those little intro parts before the recipes.  Well, Ree writes them like no other.  I had the best time reading through the book and hearing Ree's voice in my head.  (Does that sound weird?)

Anyway....stay tuned because Ree is giving away three, yes THREE, signed, yes SIGNED, copies of her book in just a bit.

one of the BEST cakes I've ever eaten. ::: kahlua (or rum) pudding cake from The Pioneer Woman Cooks: A Year of Holidays
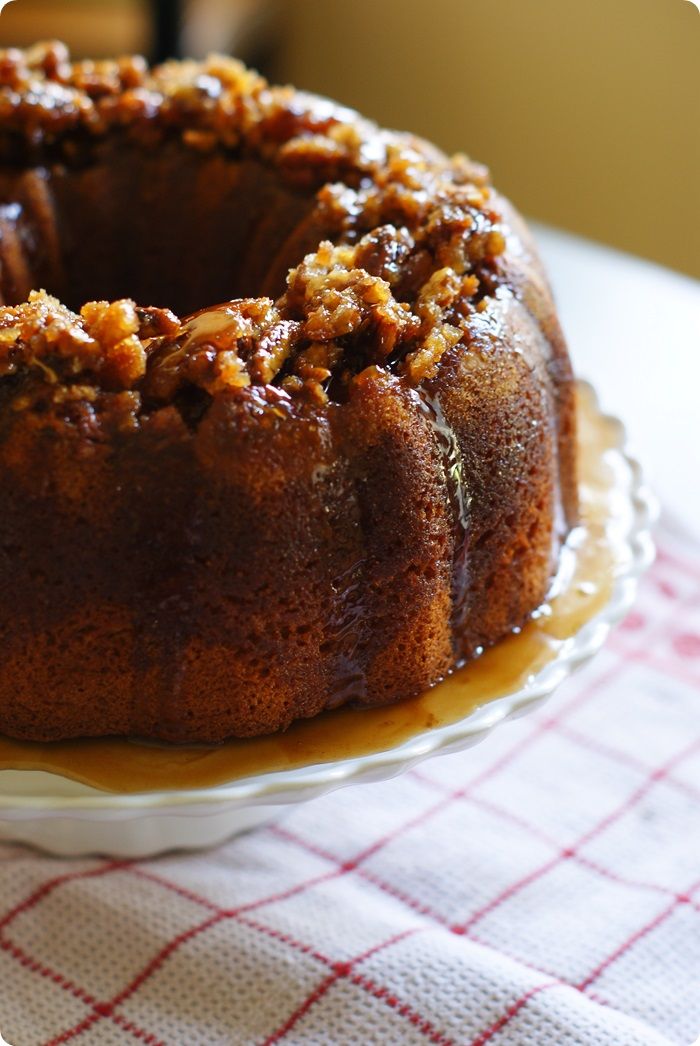
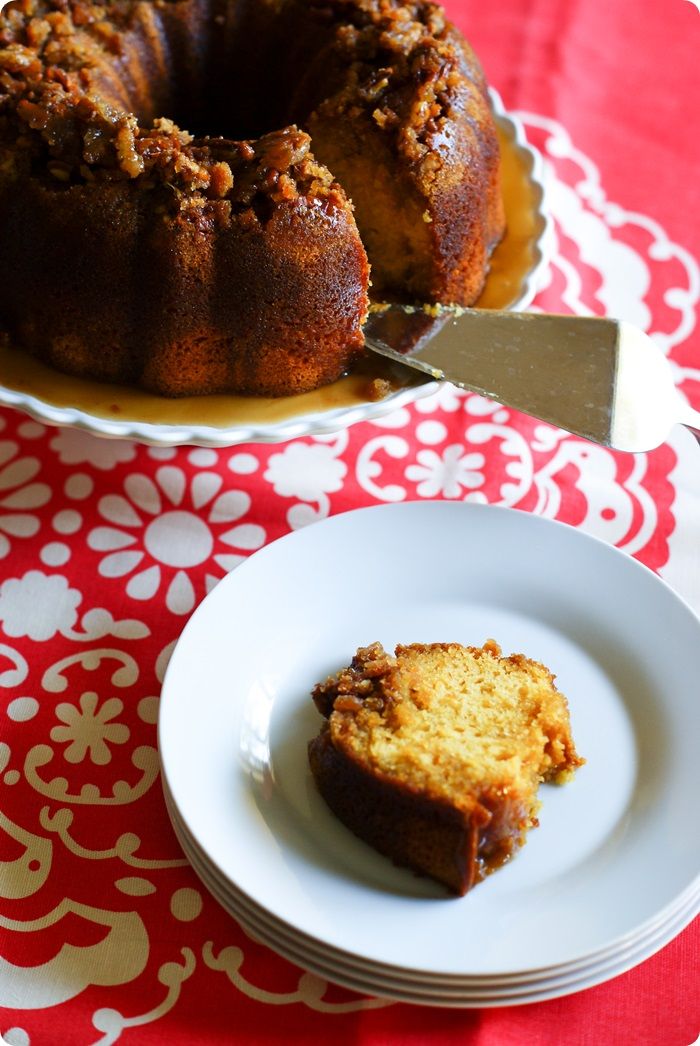
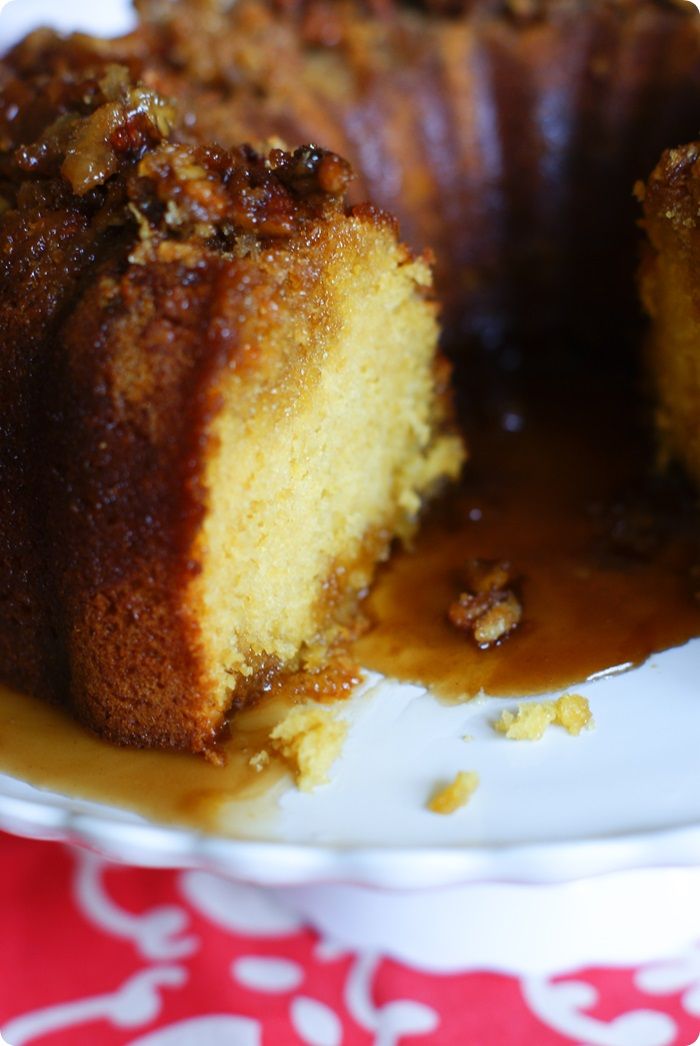
Now, let me introduce you to a cake.  A boozy cake.  A boozy cake from Ree's book that is responsible for my extra three pounds this week.

one of the BEST cakes I've ever eaten. ::: kahlua (or rum) pudding cake from The Pioneer Woman Cooks: A Year of Holidays
I made Ree's cake, and *promised* myself that I would have just a sliver after taking the pictures.  You can see in one of the pictures that the first slice out was really small.  That was my slice.

one of the BEST cakes I've ever eaten. ::: kahlua (or rum) pudding cake from The Pioneer Woman Cooks: A Year of Holidays
THEN, I decided that you really couldn't see the beautiful, moist cake, so I sliced off another piece...this time a pretty big honkin' piece.

I took the pictures, stood (I didn't even bother sitting) over the table, and INHALED both pieces.  Inhaled, I tell you.

This cake in fantastic.  I'm not sure of it's the booze, or the brown sugar pecans on the top, or the one and a half sticks of butter that are melted and poured over the cake after it bakes, or what.  The combination of it all is magical.

[Note: the cake recipe calls for rum and I used Kahlua...did you know Kahlua is rum and coffee liqueur?  You do now!]

print recipe photo printrecipe.jpg
Christmas Rum Pudding Cake
{from The Pioneer Woman Cooks: A Year of Holidays}

Cake:
1/2 cup lightly packed brown sugar
1/2 cup finely chopped pecans
1 box yellow cake mix
1 (3.4 oz.) package vanilla cook-and-serve pudding mix
4 eggs
1/2 cup water
1/2 cup canola oil
1/2 cup dark rum (or Kahlua)

Glaze:
3/4 cup (1 1/2 sticks) butter
1 1/2 cups sugar
1/4 cup water
3/4 cups dark rum (or Kahlua)

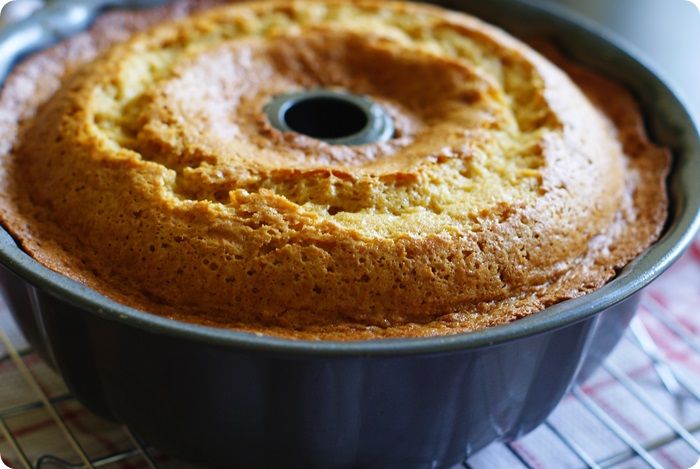
Preheat oven to 325.  Thoroughly grease a Bundt pan.  Sprinkle the brown sugar and pecans in the bottom of the pan.

In a bowl of an electric mixer, beat the cake mix, pudding mix, eggs, water, oil, and rum.  Mix until smooth and totally combined.

Pour the batter into the prepared pan and bake for 50-60 minutes until a toothpick comes out clean.

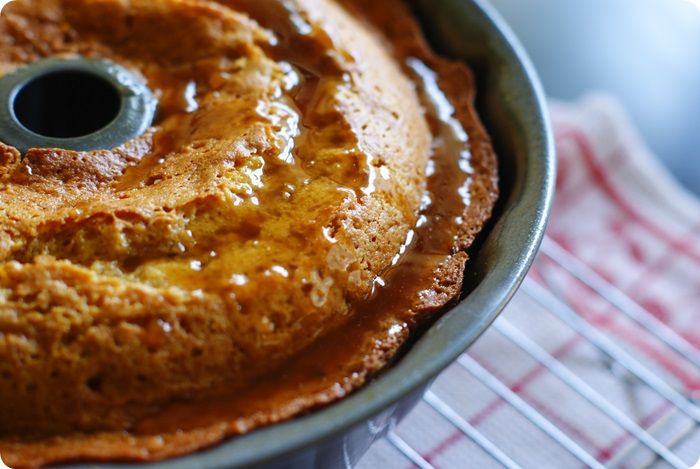
When the cake has about 10 minutes to go, make the glaze.  Melt the butter and sugar in a saucepan over medium heat.  Then add the water and bring to a boil.  Boil for 4-5 minutes, or until thick.

Turn off the heat and add the rum.  Turn the heat back on and cook for 1 minute more.

one of the BEST cakes I've ever eaten. ::: kahlua (or rum) pudding cake from The Pioneer Woman Cooks: A Year of Holidays
Remove the cake from the oven and let it cool in the pan for 5 minutes.

one of the BEST cakes I've ever eaten. ::: kahlua (or rum) pudding cake from The Pioneer Woman Cooks: A Year of Holidays
Use a skewer or toothpick to poke holes all over the surface of the cake.  Drizzle half of the glaze over the cake and down the sides.  Let it sit in the pan for 10-15 minutes, letting the glaze soak in.

Carefully invert the cake onto a serving platter.  Slowly drizzle the remainder of the glaze over the top, giving the cake a chance to absorb as much as possible.

Let the cake sit for a couple of hours to make sure it's really moist and rummy...or Kahlua-y in my case.

Eat.  Two pieces...while hovering over the table.  It's too good to waste time sitting, people.

The Pioneer Woman Cooks: A Year of Holidays
Alright...who wants a SIGNED copy?  You do!!!  
 (Would this not be the BEST Christmas gift?!?)
 
To enter:  leave a comment on this post telling me your favorite holiday food tradition.

For an extra entry: leave a SEPARATE comment telling me if you've ever tried a recipe from Ree's blog, TV show, or cookbooks.

Entries accepted through 11:59CST, November 20th.  Good luck! :) 

The Pioneer Woman Cooks: A Year of Holidays...you're going to LOVE it!!!


Minggu, 10 November 2013

Two cool gals...in cookie form.

I told you if I did all of the saint cookies in one post it would be 5 miles long.  So, here is part two of the all saints' cookie tutorial...

St.Therese of Lisieux cookie decorating tutorial...perfect for feast days, all saints' day, or to celebrate your favorite saint.

...St.Therese of Lisieux and St. Brigid of Ireland.

St. Brigid (or Bridget) of Ireland cookie decorating tutorial...perfect for feast days, all saints' day, or to celebrate your favorite saint.
All of the saint cookies were inspired by these felt dolls from Saintly Silver. 

st therese and brigid cutters photo sttheresaandbrigidcutters.jpg
The cookies start by baking two shapes together to form one.  For these sweet ladies, I used candy corn and circle cookie cutters.  Place the cut-out shapes next to each other on the cookie sheet before baking and they will bake together to form one cookie. (I like to freeze the shapes for 5-10 minutes before baking to prevent spreading.)

To make them, you'll need:

 photo sttheresaandbrigid1of9.jpg
Use a #2 tip to outline a circle for the face in copper icing.  (You can see the start of St. Michael here, also.)

Thin the copper icing with water, a bit at a time, stirring with a silicone spatula, until it is the consistency of a thick syrup.  You'll want to drop a "ribbon" of icing back into the bowl and have it disappear in a count of "one thousand one, one thousand two." Four is too thick, one is too thin.  Count of 2-3 is good.  Cover with a damp dishcloth and let sit for several minutes.

Stir gently with a silicone spatula to pop and large air bubbles that have formed.  Pour into a squeeze bottles.

Flood the face portion of the cookies with the thinned icing, using a toothpick to guide to the edges and to pop large air bubbles.

Let the icing dry at least one hour.
st therese and brigid outline collage photo sttheresaandbrigidoutlinecollage.jpg
Use #2 tips to outline the remainder of the cookie.

st therese and brigid outline 2 photo sttheresaandbrigid5of9.jpg
I used Ivory for the base of St. Therese's cookie...
st therese and brigid outline 1 photo sttheresaandbrigid4of9.jpg
...and Chocolate Brown for the base of St. Brigid's.

st therese and brigid flood collage photo sttheresaandbrigidfloodcollage.jpg
Thin and flood the outlined areas as described above.

Let the cookies dry at least one hour.

st therese and brigid details collage photo sttheresaandbrigiddetailcollage.jpg
Add piped detail on the veils and collars with a #2 tip.

For St. Therese, use a #3 tip to add three roses in the darker pink.  Use a #1 tip to pipe a swirl in the lighter pink on top.  Use a #2 tip to pipe the cross in brown icing.

For St. Brigid, use a #1 tip to add a St. Brigid's cross in green icing (I'm sure yours will be prettier than mine.)

Use a #1 tip to pipe eyes and a mouth on each.

Let the cookies dry uncovered 6-8 hours, or overnight.

The next day, use a pink food coloring pen to add rosy cheeks. (Warning: do not try this until the icing is COMPLETELY dry.)

St.Therese & St. Brigid cookie decorating tutorial...perfect for feast days, all saints' day, or to celebrate your favorite saint.
Ta-da!  The next tutorials will include St. Cecilia and St. Francis of Assisi.  Yay, saints!  

See all of the saints in this set here.
St. Michael cookie tutorial
St. Francis and St. Cecilia cookie tutorials